
☰
One of the most important aspects of a modern SEO Hosting solution is the DNS server offering. Not only a bad DNS implementation strategy can become a footprint, But It can also slow the websites down. In other hands, a right and properly planned approach provides redundancy and should appear as an enterprise-level architectural design to Google's eyes.
There are two general categories of DNS server offering that comes with each SEO Hosting package for free:
This is by far the most straightforward option. With each new order, and as a part of the welcome email, our clients get the details of 2 to 5 DNS different servers. Each listed DNS server is from a different datacenter and utterly different geography (USA, Europe and ...). Having DNS servers from different DCs helps in 2 way:
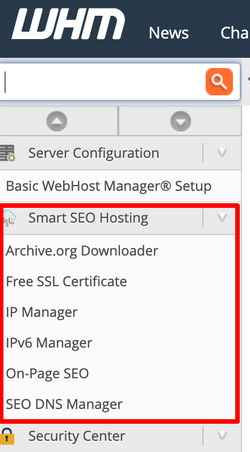 For our more advanced users, we have developed an in house WHM plugin that provides 3 more DNS server options. This plugin is available under the "Smart SEO Hosting" section of each WHM reseller account. As displayed in the screenshot, this section is the second section from the top and the "SEO DNS Manager" is one of the menu items. To access this plugin, we first need to make sure that the "Smart SEO Hosting" section is expanded and then click on the menu item. The simple interface has 2 main sections. On the leftmost side, there is a list of all domains under the current reseller account. On the right side, there are 3 different available DNS strategies. Namely "3rd Party DNS Servers", "Own IP" and "Vanity/Dedicate DNS Servers."
  To set up a new DNS server for an existing domain reseller should pick a domain from the list of his/her domains and apply one of the strategies on the right part of the page.
This strategy provides access to a list of 3rd party DNS servers. These servers do not share any name with SEO nor SEO Hosting and are all dedicated DNS servers. In other words, not only the IP addresses of these DNS servers only used for DNS servers. Those domains are also only used as DNS servers. 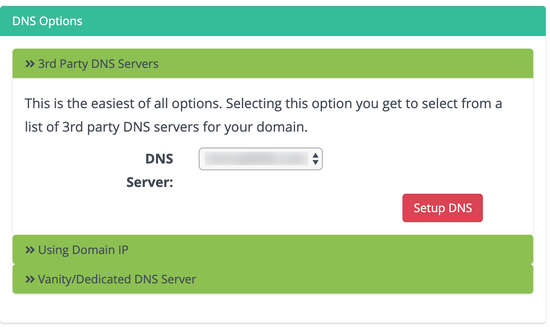 Applying this option is very easy. After selecting a domain name, a reseller picks a 3rd party DNS server from the list of DNS server providers (5 different providers) and clicks on the apply button. The plugin then updates the DNS zone and provides straightforward instruction on how to make the final changes with the domain registrar. This option is very popular among customers who do not want to register their name servers with their domain registrars.
This is the second strategy available to our client and is very popular among many SEO agents. The idea behind this approach is very simple. The reseller gets to have ns1.yourname.com and ns2.yourname.com, and the IP used for both name servers is the IP assigned to the domain name (yourdomain.com). 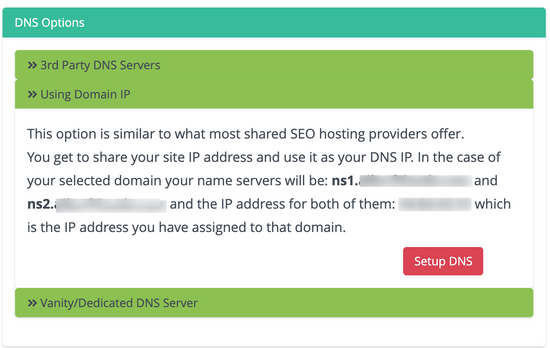 The idea behind this approach is simple — the less information you provide Google, the fewer chances of any footprint. When all Google has is one IP dealing with a domain, there is technically no way for Google to build a graph of the PBN. As demonstrated in the picture, to apply this strategy, a reseller needs to select the second option on the right panels and then click on the apply button. The system then provides a list of actions that need to be done through the domain registrar interface. Namely, the reseller needs first to register the name servers (ns1.yourdomain.com and ns2.yourdomain.com) and then change the name servers of the domain to the newly registered name servers. You can also find a list of instruction on how to register name servers here. This approach provides the best secrecy (which makes it a prevalent option) but at the same time, having a single IP can become the single point of failure.
The last strategy expands on the 2 previous strategies. Here, our resellers, get to pick 2 different and dedicated DNS server IPs from a list of dedicated DNS IPs that are provided for free. 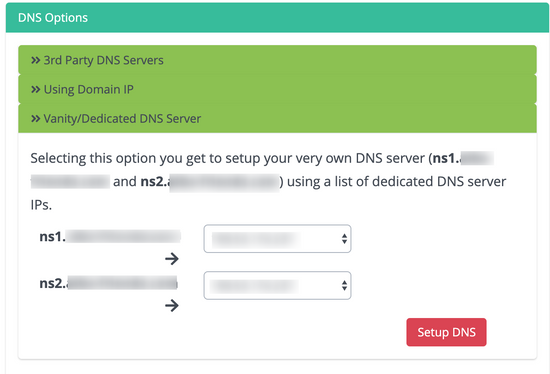 Using this strategy, our resellers build 2 separate DNS servers (ns1.yourdomain.com and ns2.yourdomain.com) and can pick 2 different IPs for each name server. Having 2 different IPs mitigates the single point of failure issue while provides a no footprint approach as the IPs are only used as dedicated server IPs.